
By Janice F. Booth
Now that the gardening season is drawing to a close, this may be a perfect time to reflect on how you and others traverse your garden and whether now may be the time to redesign the paths that have evolved out of necessity in your garden. Could you make the experience of your garden richer by redesigning or expanding your paths?
Being “led down the garden path” is a phrase that’s come to mean being duped or tricked, and in some ways, paths may accomplish just that in our gardens, hiding this flaw and drawing attention to that feature. Ideally, a path may guide one’s steps to discover hidden beauty or a secret vista. Or, a path may simply serve as a walkway from the back door to the driveway, from the patio to the recycle can.
Let me propose an activity: It involves a bit of mapping to help you decide if improving or redesigning your path is a worthwhile project. Try sketching out your garden, its flowerbeds, points of interest, and paths—where you walk and where you sit in your garden. Don’t worry about accuracy; just a bird’s eye view will do. It may be interesting to notice how easy or difficult it is for you to complete this little map. What parts of your garden stay with you, are stamped in your mind’s eye? Look at those paths you’ve marked on your map; are they purposeful and utilitarian, or meandering and pleasurable? Perhaps, they’re a combination—ideal for a small garden.
So, are you committed to a Path Project? Then, you’re ready for Phase One. How you approach this project will depend on five basic considerations. υ
Now, take another look at that little map you sketched. If your garden has limited space, you’ll want to look closely at your existing path. Do you only want to tidy up the appearance of that path? Or, could you add a few curves, soft turns to slow the pace and encourage kids, pets, and visitors to enjoy what your garden offers on the way to dump the trash or hop in the car? Maybe you’re ready to scrap the old path and design a more purposeful path that can serve as an added feature in your garden. Walk through early in the day and after dark with an eye to where you place your feet.
Keep in mind all you’ve learned about traversing your garden as you undertake Phase Two: choosing the paving material.
Japanese gardeners take pathways very seriously. They see the paving of the path as a means of guiding the visitor to points of interest and a means of controlling the visitor’s speed and concentration as he or she walks the path. For example, a narrow path of large river stones requires slow, contemplative progress, placing feet carefully, and keeping one’s head down. When the visitor reaches a large, smooth, flat stone, the response is to pause, look up, and for the first time, experience this particular spot in the garden. The path’s surface has guided not only direction, but speed and awareness. Alternatively, wandering along a wide gravel or mulch path, the visitor walks comfortably, looks about, engages in seeing the garden as she or he traverses it.
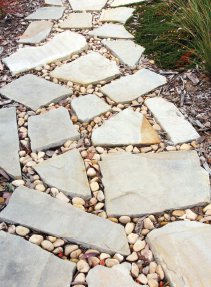
Think of your design purpose for the path you’re creating: destination, meandering, or sightseeing. Now, you’re ready to choose the material for the path. If space is not an issue, you have many interesting options. Pavers or flagstones provide a durable, safe surface for your path. They’re traditional and provide a stable surface. Gravel or moss between the slate pavers or flagstone will soften the appearance. Wood makes a beautiful though less durable path. Slats of equal or varied length are attractive. An interesting alternate wood path is made of sliced wood, cut radially, like slicing a carrot, and set among gravel. The trick with wooden disks is keeping them of even height and only slightly above the ground. Bamboo is another option, attractive but less durable. Bamboo mats can be laid over a bed of mulch. Brick or cobblestones are good choices for heavily traveled paths. A professional mason can lay the bricks in lovely patterns.
Some paving materials are pleasantly unobtrusive, such as mulch, pea rock, or gravel. A new alternative is compacted recomposed granite. This durable substance resembles fine gravel or sand. There are two drawbacks to these more modest solutions. First, you’ll need to contain them within the path’s borders. Installing flexible metal or rubber borders will hold in the material—keep the mulch from smothering the moss roses, or the gravel from spreading into the grass. Second, mulched or graveled paths need regular refreshing. Even with sturdy borders, the mulch will float away; the rock or gravel will be kicked or carried hither-and-yon. So, plan to keep a spare bag or two of your material in the garage or garden shed for refreshing the path.
If you’re feeling creative, let me mention a few materials that you could employ as part of your autumn path project. First, for the artists among you, how about creating a mosaic path of pebbles or recycled bottle-glass. The pebble mosaic requires stones of varying sizes and colors to compose a geometric or whimsical design along your path. Recycled glass demands some preliminary materials preparation. You’ll want to get a bottle cutter and cut off the bottoms of bottles, preferably of varied colors. Then, place these glass disks edge-down into the path, and surround the glass with moss or pea rock. As with the wood disks, you’ll find the challenge is keeping all the disks an even height close to the ground.
A second creative project, for the engineers and philosopher-gardeners, consists of adding a labyrinth or maze to your garden. And no, they’re not synonymous. A labyrinth is a single path, usually circular and narrow, that one traverses contemplatively. A maze is a puzzle, either two or three-dimensional. The visitor tries to find the paths that will take him or her to the center of the maze where a bubbling fountain or tiny pool and inviting bench awaits. A maze can be constructed from elaborate hedges and flowerbeds of varying heights and depths. A labyrinth is usually a simple path set into a bed of grass or low vegetation.
Or, how about a little building project? How about adding a walking bridge along your garden’s path? If you have a pond, you have a natural setting for a pretty, arched bridge. Think of Monet’s “Japanese Bridge” over the lily pond. Lacking a pond, create a flat bridge that simply intersects the path at a point of interest in your garden. In either case, the bridge becomes a stopping point, an opportunity for you or the visitor to pause, lean against the railing, and look and listen to the garden.
Finally, Phase Three: You’re ready to discuss your garden-path project with a landscape firm or undertake the work yourself. You know what you want your path(s) to achieve, you know what problems you’re likely to encounter and overcome, and you have a vision of the finished pathway.
1. Space:
How much room does your garden have for paths, and could you dedicate more space to paths, or do you need to make your existing paths more efficient?
2. Purpose:
Why is your existing garden path as it is? Is the path utilitarian merely a way to move among your flowerbeds? Have your eager terriers plowed a path from house to the garden gate? Or, does your path reflect your own wanderings among your favorite plants or beneath your shady poplar?
3. Objective:
Do you want your walkway to guide and direct visitors among your garden’s delights, or do you want your path to control traffic, and keep
brpets and kids away from fragile stems and blossoms? Maybe a bit of both.
4. Highlights:
Which of your garden’s delights might you want to feature? Could your path’s design direct the wanderer to your small pond or the bench beneath your majestic oak tree?
5. Flaws:
Are there problem areas in the garden that you may want to disguise or avoid? Are there waste cans that lurk in the corner or behind the spruce tree? Is there a low spot where the garden becomes a bog after it rains?
